#programming#rust-programming-language#rustlang#rust#terminal
Building Rustlens: A TUI for Rust Code Inspect

The Problem Everyone Has But Nobody Talks About
Let me paint you a picture. It’s 2 AM. You’re SSH’d into a server debugging a Rust project. The connection has that beautiful 200ms lag that makes VSCode feel like you’re typing through molasses. You need to understand how tokio::spawn works in this specific codebase.
Your options are… not great:
Open VSCode and wait 3 seconds for every keystroke
Use grep and scroll through 400 lines of noise
Spend 15 minutes crafting the perfect rg regex, then realize you excluded the one file you needed
Just read the docs and guess how it’s being used
I got so frustrated with this that I did something stupid: I built my own tool.
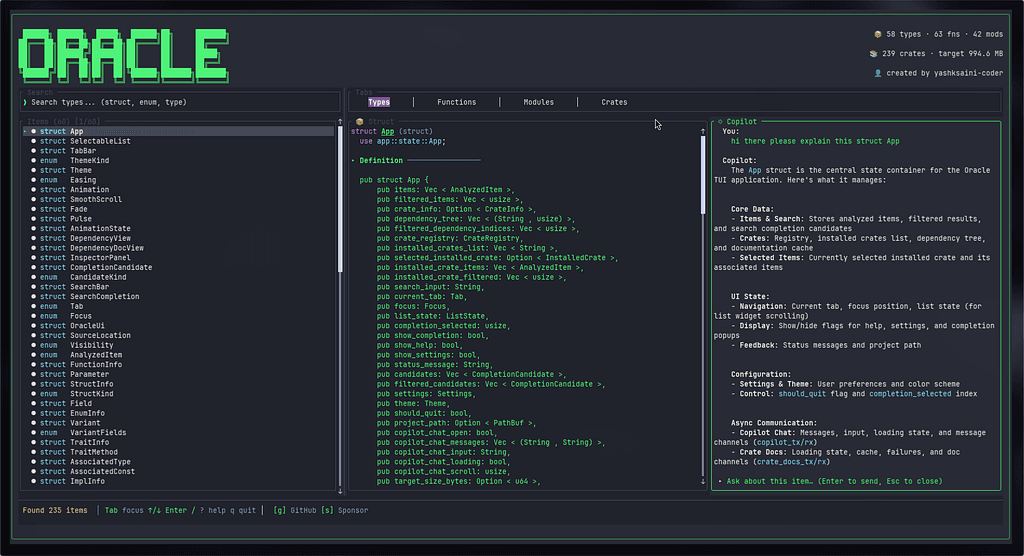
That tool is Oracle — a terminal-based code inspector for Rust that actually feels good to use.
What is Oracle?
Oracle is basically what happens when you get annoyed enough to build your own code inspector. It’s a terminal UI for Rust projects that:
Uses Rust’s actual parser (syn) to deeply understand your code
Has fuzzy search that actually works well
Visualizes your dependencies from Cargo.toml
Integrates with crates.io for live documentation
Has four genuinely nice-looking themes
Includes smooth animations (because I have no chill)
All of this runs in your terminal. No GUI, no Electron eating 500MB of RAM, no browser tabs. Just fast, local code analysis.
How It Actually Works (The Technical Bits)
1. Parsing with syn
So here’s the cool part: Oracle uses syn, which is literally the same parser that Rust’s compiler uses for procedural macros. This means it understands Rust code at a deep level — not just pattern matching on text like grep.
When you feed it a struct like this:
#[derive(Debug, Clone)]
pub struct Config {
    pub host: String,
    pub(crate) port: u16,
    timeout: Duration,
}
Oracle extracts:
Every field with its type
Visibility modifiers (public, crate-local, private)
The derives being used
Documentation if present
Exact source location
It’s not searching. It’s understanding.
2. Building the UI with Ratatui
The terminal UI uses Ratatui, which is this awesome framework for building TUIs. It’s what powers tools like bottom and gitui.
The layout is basically three panels:
Items List (20%) — where you browse functions, types, modules
Inspector Panel (80%) — where you see full details with syntax highlighting
Header — showing the Oracle logo and current context
You cycle between panels with Tab. Use j/k to navigate (Vim-style because I’m that person). Type / to search.
It just feels natural if you live in the terminal.
3. Fuzzy Search That Doesn’t Suck
The search uses fuzzy-matcher with the SkimMatcherV2 algorithm. Basically, you type “deser” and it finds:
Deserialize
Deserializer
deserialize_struct
custom_deserialize
All ranked by relevance. It’s the same fuzzy matching VSCode uses for Ctrl+P.
The code is simple:
let matcher = SkimMatcherV2::default();
let scored: Vec<_> = items
    .iter()
    .filter_map(|item| {
        matcher.fuzzy_match(&item.name, query)
            .map(|score| (item, score))
    })
    .collect();
scored.sort_by(|a, b| b.1.cmp(&a.1));
Simple, effective, fast.
4. Dependency Integration
Oracle reads your Cargo.toml using the cargo_metadata crate (the same tool cargo uses internally). Then it:
Builds your full dependency tree
Scans ~/.cargo/registry for installed versions
Fetches live info from crates.io’s API
Shows GitHub repo stats (stars, forks, last update)
Press o to open docs.rs in your browser. Press c for crates.io. It’s just convenient.
5. The Animation Thing
Okay so this is where I got a bit extra. I added animations to a CLI tool. Smooth scrolling with momentum, fade-in effects for selections, easing functions for tab transitions.
Here’s the scroll implementation:
pub struct AnimationState {
    selection_highlight: f64,  // 0.0 → 1.0
    scroll_position: f64,
    transition_progress: f64,
}
fn update(&mut self) {
    // Ease-out for smooth deceleration
    self.scroll_position += (target - current) * 0.2;

    // Fade in the highlight
    self.selection_highlight = min(1.0, highlight + 0.15);
}
It runs at 60fps when animating, drops to 10fps when idle to save CPU. The result feels smooth in a way most TUIs just don’t.
GitHub Copilot CLI: The Real MVP
Here’s the thing: This was my first real Rust project that involved TUIs, parsers, async HTTP, all of it. I was basically learning everything as I went.
GitHub Copilot CLI became my teaching assistant, my documentation search engine, and my rubber duck all at once. And I never had to leave my terminal.
Let me show you exactly how it helped at each stage.
Stage 1: Figuring Out the syn Crate
THE PROBLEM: I’m staring at syn’s documentation trying to figure out how to extract struct fields with their visibility modifiers. The docs are comprehensive but dense. I just want to see an example.
WHAT I DID:
gh copilot suggest "parse rust struct with syn extract fields visibility"
WHAT COPILOT GAVE ME:
use syn::{ItemStruct, Fields, Visibility};
match &st.fields {
    Fields::Named(named) => {
        for field in &named.named {
            let name = field.ident.as_ref().unwrap();
            let ty = &field.ty;
            let vis = match &field.vis {
                Visibility::Public(_) => "pub",
                Visibility::Crate(_) => "pub(crate)",
                _ => "private",
            };
            // Process field...
        }
    }
    // Handle Tuple and Unit structs...
}
THE IMPACT: This single pattern became the foundation for everything. I just extended it to handle enums, traits, impl blocks, modules — all the Rust item types.
TIME SAVED: Probably 8 hours of docs-diving and trial-and-error.
Stage 2: Building Layouts with Ratatui
THE PROBLEM: I wanted multiple panels, proper borders, scroll support. But Ratatui’s constraint system was confusing me. How do you even compose these layouts?
WHAT I ASKED:
gh copilot explain "ratatui layout constraints nested vertical horizontal"
WHAT I LEARNED: Layouts are composable. You can use Constraint::Percentage(20) for flexible sizing and Constraint::Length(3) for fixed. Nest them for complex UIs. It’s like Flexbox but for terminals.
Then:
gh copilot suggest "ratatui scrollable text panel with border"
GOT THIS PATTERN:
let block = Block::default()
    .borders(Borders::ALL)
    .border_style(border_style)
    .title(" Inspector ");
let paragraph = Paragraph::new(lines)
    .block(block)
    .scroll((scroll_offset as u16, 0))
    .wrap(Wrap { trim: false });
paragraph.render(area, buf);
Built my entire UI system in one afternoon. The inspector panel, the list view, the search bar — all using variations of this pattern.
TIME SAVED: At least 6 hours of fighting with layouts.
Stage 3: Fuzzy Search That Actually Works
THE PROBLEM: I wanted VSCode-level search. Type a few letters, get relevant results instantly.
WHAT I ASKED:
gh copilot suggest "rust crate for fuzzy string matching with scoring"
THE ANSWER: Use fuzzy-matcher with SkimMatcherV2.
use fuzzy_matcher::skim::SkimMatcherV2;
use fuzzy_matcher::FuzzyMatcher;
let matcher = SkimMatcherV2::default();
let mut scored: Vec<_> = candidates
    .iter()
    .filter_map(|candidate| {
        matcher.fuzzy_match(&candidate.name, query)
            .map(|score| (candidate, score))
    })
    .collect();
scored.sort_by(|a, b| b.1.cmp(&a.1));
It worked on the first try. Like, actually worked. Those moments are rare and beautiful in programming.
TIME SAVED: 4 hours of researching fuzzy search algorithms.
Stage 4: Cargo.toml Parsing
THE PROBLEM: Parsing Cargo.toml manually would be insane. There are workspaces, transitive dependencies, version specs, feature flags…
THE SOLUTION:
gh copilot explain "cargo metadata rust crate dependencies workspace"
Learned about cargo_metadata — a crate that gives you structured JSON output of your entire dependency graph.
use cargo_metadata::MetadataCommand;
let metadata = MetadataCommand::new()
    .manifest_path(&manifest_path)
    .exec()?;
let root = metadata.root_package()?;
for dep in &root.dependencies {
    if dep.kind == DependencyKind::Normal {
        // Process dependency...
    }
}
The entire dependency analysis feature was built in one evening.
TIME SAVED: 5 hours minimum.
Stage 5: crates.io Integration
THE PROBLEM: Wanted to show live crate info (descriptions, GitHub stars, licenses). Never done HTTP in Rust before.
WHAT I ASKED:
gh copilot suggest "rust async http get crates.io api reqwest"
THE PATTERN:
use reqwest::blocking::Client;
fn fetch_crate_docs(name: &str) -> Result<CrateDoc> {
    let client = Client::new();
    let url = format!("https://crates.io/api/v1/crates/{}", name);

    let response = client.get(&url).send()?;
    let json: serde_json::Value = response.json()?;

    Ok(CrateDoc {
        name: json["crate"]["name"].as_str()?.to_string(),
        description: json["crate"]["description"].as_str().map(String::from),
        repository: json["crate"]["repository"].as_str().map(String::from),
    })
}
Then for GitHub stats, asked about parsing repo URLs and hitting their API. Got that working too.
Full integration in one night.
TIME SAVED: 3 hours of API documentation.
Stage 6: Cross-Platform Paths
THE PROBLEM: Windows paths use backslashes. Unix uses forward slashes. I needed to convert file paths to module paths (src/analyzer/parser.rs → [“analyzer”, “parser”]) in a way that works everywhere.
THE ASK:
gh copilot suggest "rust pathbuf strip prefix get module path vector"
THE SOLUTION:
fn derive_module_path(path: &Path) -> Vec<String> {
    path.iter()
        .skip_while(|c| *c != "src")
        .skip(1)
        .filter_map(|c| {
            let s = c.to_str()?;
            if s.ends_with(".rs") {
                Some(s.trim_end_matches(".rs").to_string())
            } else {
                Some(s.to_string())
            }
        })
        .filter(|s| s != "lib" && s != "main" && s != "mod")
        .collect()
}
Works on Windows, Mac, Linux. No platform-specific code needed.
TIME SAVED: 2 hours of debugging path separators.
Stage 7: Animation Polish
THE PROBLEM: I wanted smooth, momentum-based scrolling. Not jumpy, not janky, just… smooth.
WHAT I ASKED:
gh copilot suggest "rust easing functions cubic ease in out animation"
GOT THE MATH:
pub fn ease_out(t: f64) -> f64 {
    1.0 - (1.0 - t).powi(3)
}
pub fn ease_in_out(t: f64) -> f64 {
    if t < 0.5 {
        4.0 * t * t * t
    } else {
        1.0 - (-2.0 * t + 2.0).powi(3) / 2.0
    }
}
// Apply it
fn update(&mut self) {
    let diff = self.target - self.current;
    self.velocity = diff * 0.15;
    self.current += self.velocity;

    if diff.abs() < 0.5 {
        self.current = self.target;  // Snap when close
    }
}
Result: 60fps butter-smooth scrolling. In a terminal. Because why not.
TIME SAVED: 2 hours of tweaking animation curves.

Technical Challenges and How I Solved Them
Challenge 1: Parsing Large Projects Without Freezing
THE PROBLEM: Analyzing tokio (200+ files) froze the terminal for 10 seconds.
THE SOLUTION:
Moved parsing to background threads
Added splash screen with wave animation
Pre-computed search indices
Incremental rendering
KEY INSIGHT FROM COPILOT:
gh copilot explain "rust rayon parallel iterator parse files"
Learned to use rayon for parallel parsing:
use rayon::prelude::*;
let items: Vec<_> = files
    .par_iter()  // Parallel iterator
    .filter_map(|path| analyzer.analyze_file(path).ok())
    .flatten()
    .collect();
RESULT: 200 files parsed in ~2 seconds.
Challenge 2: Memory Efficiency
THE PROBLEM: Storing full syntax trees for 50,000 items used 500MB RAM.
THE SOLUTION:
Extract only needed info (no full AST retention)
Use String instead of TokenStream
Lazy-load inspector details
Cache only visible items
COPILOT HELPED IDENTIFY MEMORY HOTSPOTS:
gh copilot explain "rust drop ast reduce memory after parsing"
Challenge 3: Responsive Search on Large Projects
THE PROBLEM: Filtering 10,000 items felt laggy (100ms+ per keystroke).
THE SOLUTION:
Filter by active tab (only search functions in Functions tab)
Limit displayed results to 50
Debounce search input
Run filtering in background thread
CODE PATTERN FROM COPILOT:
// Filter by tab
let candidates: Vec<_> = match current_tab {
    Tab::Functions => items.iter().filter(|i| matches!(i, AnalyzedItem::Function(_))),
    Tab::Types => items.iter().filter(|i| matches!(i, AnalyzedItem::Struct(_) | AnalyzedItem::Enum(_))),
    // ...
}.collect();
// Fuzzy match + score
let scored = filter_candidates(&candidates, query);
// Take top 50
scored.iter().take(50).collect()
RESULT: Search always under 16ms (60fps responsive).
Challenge 4: Cross-Platform Terminal Control
THE PROBLEM: Terminal control sequences differ between Windows (ConPTY), macOS (BSD), Linux (ANSI).
THE SOLUTION: Use crossterm crate (it handles platform differences).
COPILOT TAUGHT ME:
gh copilot explain "crossterm enable raw mode terminal colors rust"
use crossterm::{
    terminal::{enable_raw_mode, disable_raw_mode},
    event::{self, Event, KeyCode},
    execute,
};
// Works on Windows, macOS, Linux
enable_raw_mode()?;
execute!(stdout, EnterAlternateScreen)?;
// ... TUI code ...
disable_raw_mode()?;
execute!(stdout, LeaveAlternateScreen)?;
RESULT: One codebase, three platforms. No conditional compilation needed.
What Makes Oracle Different?
1. Built for the Terminal, Not Adapted to It
Most code browsers are GUIs first. Oracle was designed from the ground up for terminal use:
Vim keybindings (j/k, g/G, /)
Works over SSH (no X forwarding)
One command: oracle
Zero configuration
2. Deep Rust Understanding
Oracle doesn’t just grep for text. It understands:
Visibility (pub, pub(crate), private)
Lifetimes and generics
Trait bounds and where clauses
Async/const/unsafe modifiers
Derive macros and attributes
Example: Search for “deserialize” and Oracle shows the Deserialize trait, all impl blocks for it, functions using it as a bound, and structs deriving it.
3. Fast Enough to Be Reflexive
Startup: under 2 seconds for 200 files
Search: under 16ms per keystroke
Navigation: 60fps animations
Memory: ~50MB for large projects
Fast enough that you don’t think about it.
4. Beautiful by Default
Four carefully crafted themes:
Default Dark — Clean and professional
Nord — Cool blues and muted pastels
Catppuccin Mocha — Warm and cozy
Dracula — High contrast drama
All with syntax highlighting, smooth scrolling, and polished UI.
Real-World Usage
Scenario 1: Understanding Third-Party Crates
You add tokio to your project. How does spawn work? What traits does Future require?
BEFORE ORACLE:
Clone the tokio repo
Grep through files (47 matches for “pub fn spawn”)
Read docs (if you remember the module path)
Wait 30 seconds for cargo doc to build
WITH ORACLE:
oracle ~/.cargo/registry/src/*/tokio-*
Press 4 to go to Crates tab
Navigate to “tokio”, press Enter
Type “spawn” in search
See signature, docs, parameters, bounds
Press ‘o’ to open docs.rs for deep dive
TIME SAVED: 5 minutes → 30 seconds.
Scenario 2: Navigating Your Own Project
You’re debugging a function. What does it call? What calls it? What trait bounds does it have?
BEFORE ORACLE:
rg "fn process_request"  # Find definition
rg "process_request\("   # Find call sites (regex required)
# Open in editor, read 200 lines of context
WITH ORACLE:
oracle
Type “process_request”
Press Enter
See full signature with parameters, return type with error handling, documentation, and source location
Press ‘l’ to see the inspector, scroll through impl
TIME SAVED: 3 minutes → 20 seconds.
Scenario 3: Learning Rust Patterns
You’re learning async Rust. How do pros structure their code?
BEFORE ORACLE:
Clone exemplar projects like axum
Read through src/ (20 files, where to start?)
Open lib.rs (1200 lines…)
WITH ORACLE:
oracle ~/code/axum
LEARNING CURVE: Weeks → Days.
Installation and Getting Started
Prerequisites
Rust 1.75+ (install via rustup.rs)
Git (to clone the repo)
Install from Source
git clone https://github.com/yashksaini-coder/oracle.git
cd oracle
cargo install --path .
Note: Publishing to crates.io coming soon.
Usage
# Analyze current directory (must have Cargo.toml)
oracle
# Analyze specific project
oracle ~/code/my-rust-project
# Analyze a single file
oracle src/main.rs
# Set GitHub token for API (optional, for crates.io features)
export GITHUB_TOKEN=ghp_yourtoken
oracle
Conclusion
Building Oracle taught me that great developer tools can live entirely in the terminal. You don’t need Electron, you don’t need a browser, you don’t even need a GUI.
If you work with Rust, give Oracle a try. It might change how you explore codebases. Please support the open source project By Star that encourages me to build more pretty TUI stuff.
GitHub Repository: github.com/yashksaini-coder/oracle
Built with Rust, Ratatui and GitHub Copilot CLI
Questions? Feedback? Want to contribute?
Drop a comment or open an issue on GitHub. Let’s make terminal tools great again.